
As we mentioned in our previous posting [not yet published–coming soon!], we have a problem with the trailer not tracking properly behind us. Instead, the rear end is several inches closer to the center-line of the road than the truck is. We clearly have a problem with the two trailer axles not being parallel to each other, and/or not square to the frame of the trailer. I had speculated that this could be remedied by moving the point where the U-bolts clamp the axles to the leaf springs, though I’ve since found out you can’t do that. Not knowing that at the time, I wanted to take a picture to show the U-bolts. Little did I know that trailer suspension repair was about to begin!
The Broken Leaf Spring Mount
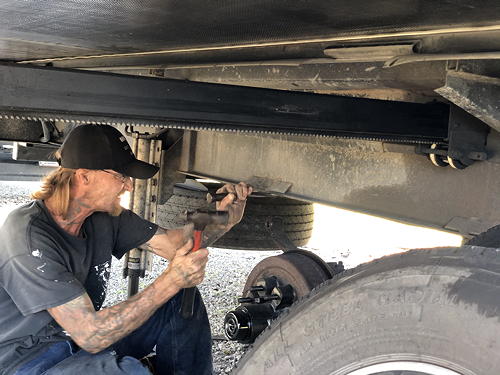
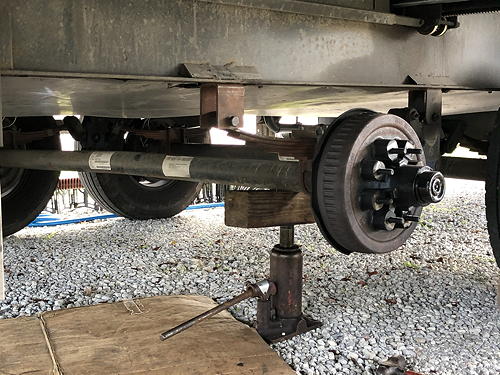
I climbed under the trailer to take that photo. I was astonished to see the following:
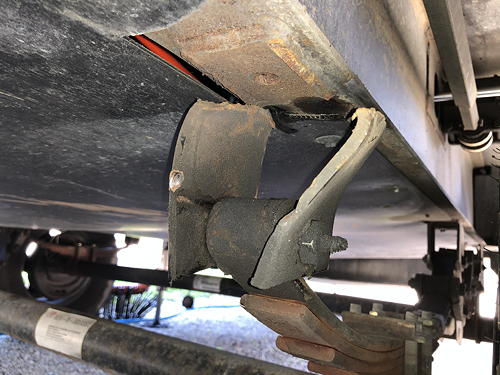
As you can see, the mounting bracket that attaches the rear-most leaf spring to the trailer frame has broken apart. Looking at it, it looks like it failed under a side load. That’s most likely to have happened on a tight U-turn. During such turns, the rear axle of the trailer is forced to swing sideways against the friction of the tires on the pavement.
We have been in campgrounds, such as the Savannah South KOA, where the routing of the roads essentially forces you to take a very sharp turn. Perhaps that’s how we broke our leaf spring mounting bracket. However, that simply shouldn’t happen. The bracket should be engineered to handle any normal loads it is expected to face. Furthermore, it should be manufactured and welded in such a way that the metal is not weakened.
How Long Has It Been Broken?
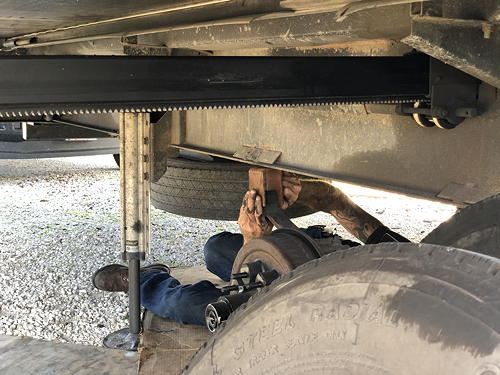
Note how rusted the edges are where the bracket broke apart. That really astonished me. Clearly, it’s been like this for a while! We’re lucky that this didn’t cause further damage. The remaining seven brackets have to take up all the forces, including those normally borne by the failed bracket. Fortunately, no other brackets broke.
So, now what? Our trailer is now fourteen months old so the comprehensive one-year warranty period has recently ended. It’s entirely possible that the mounting bracket actually failed within the first year, given how rusted it is. There’s also a three-year structural warranty, though I don’t know if that covers suspension components.
Regardless, to protect our warranty interests, we decided to find the nearest authorized service center.
Who Can Repair It?
We went to the manufacturer’s web site, keystonerv.com, and found that the nearest authorized service center was Tropical RV Sales, just a few miles from the campground where we were staying, the Fort Pierce / Port St. Lucie KOA. We also emailed the Warranty person, Patricia, at our dealer where we bought the trailer, 417rv. Patricia responded promptly and recommended that we contact the nearest authorized dealer or service center so that they could submit a pre-authorization for the repair.
Tropical RV Sales
At Tropical RV Sales, we spoke to Wendy. She was very helpful. She called in her service technician to look at our picture of the broken leaf spring mounting bracket. Unfortunately, though, their service department was fully booked for the next three weeks. Besides, they wouldn’t do the welding themselves. Instead, they would contract it out to Meltra Trailer Sales. So, they recommended that we go there. Wendy did offer to submit the warranty pre-authorization, but she said that if she did that on our behalf, we’d have to get the repair done there. Since that would be a three-week wait, and we were leaving in a week, that wasn’t going to work. Instead, she suggested that we contact the Keystone Customer Service line and speak to them directly about the warranty coverage.
Meltra Trailer Sales
After the short drive to Meltra Trailer Sales, we showed the picture of the broken leaf spring mount to the fellow at the counter. “Wow!”, he said, and called over two other employees to look at it. That’s never a good sign.
After they’d all looked at the picture, they said that they could do the work but we’d have to bring the trailer to them. Given it’s current condition, they recommended against that. Instead, they referred us to a former employee that now runs a mobile trailer repair service, Bill Spangler.
Keystone Customer Service
As recommended by Wendy, we called Keystone Customer Service about the failure of the mounting bracket when we got back home to the trailer. Initially, we spoke to Bokamoso. She asked for pictures of the failed part, pictures of the pads between the axles and the leaf springs, and exterior pictures of the trailer on all four sides. I thought that was a bit unusual, but I guess the mounting pads would be crushed if we’d gone over a really bad bump. However, they were all normal. I suppose the exterior pictures confirm that the trailer is in good condition, which guards against fraud. So, we sent all the requested pictures.
The next day, just before lunch, Keystone customer service manager Shelly called. She sympathized with our plight and offered to courier a replacement bracket to us. By this time, Bill Spangler had looked at the broken bracket and was planning to replace it with one that he had. Also, the part wouldn’t arrive until Monday and Bill was planning to do the work on Saturday. So, we declined her kind offer.
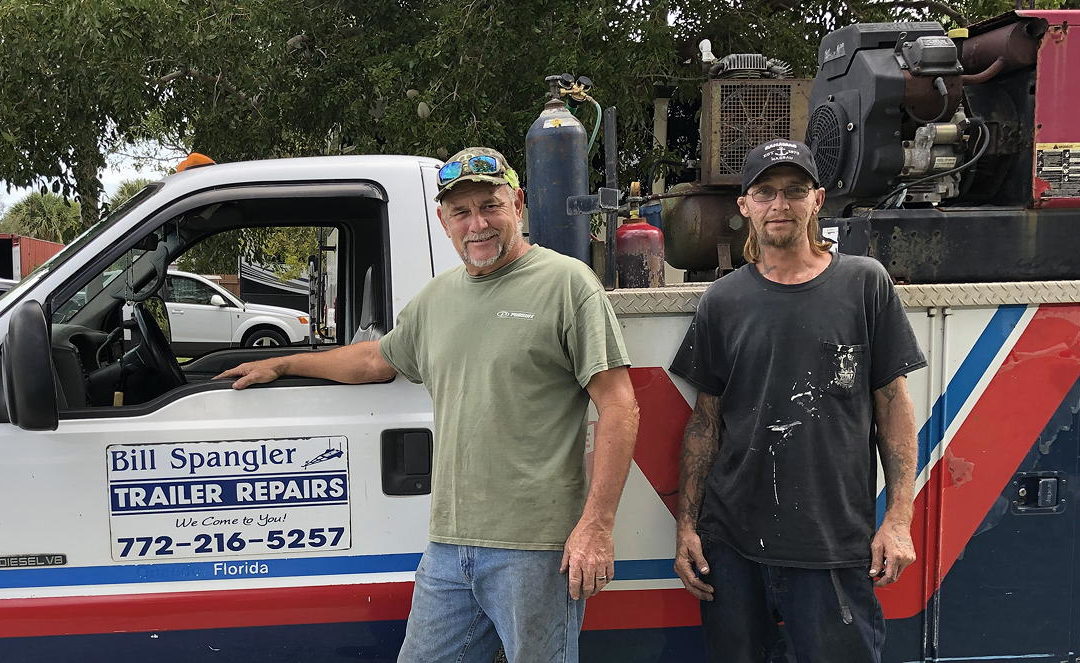
Bill Spangler
When we got back home to the trailer from Meltra Trailer Sales, we called Bill. He said he’d be over the next morning to look at it.
The next morning, Bill looked at the broken bracket. He told us that it looked like it had failed doing a sharp U-turn, confirming our suspicions, and that he’d seen a lot of failures like this. He said he could do the repair the next day, which was Saturday, November 9th. It would cost us about $150 or so, depending on how long it took to do the job. Also, he said he’d look at the other seven brackets and add a welding bead to them if they were cracked.
Unfortunately, it was pouring rain on Saturday so Bill said he’d be over on Monday, and he was. It occurred to me that perhaps, after all, we could have used the mounting bracket that Shelley had offered to courier to us.
The Repair
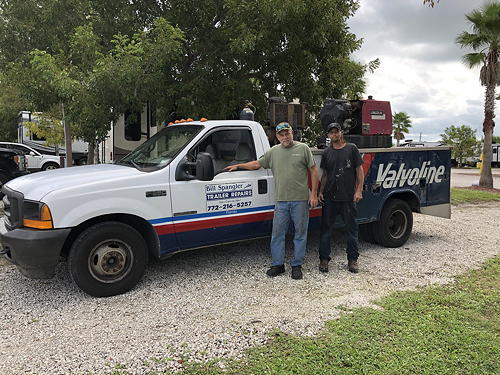
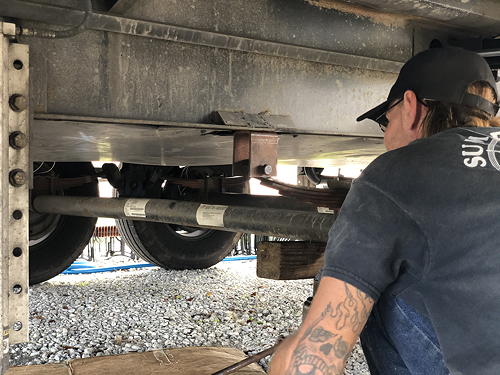
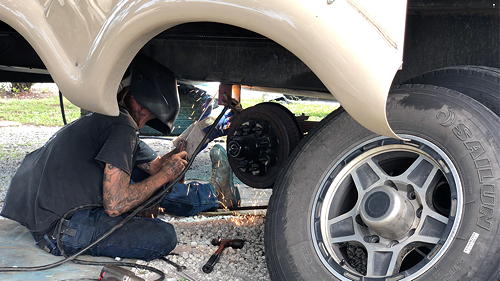
Bill arrived in his truck with his welder, John. Bill is on the left in the picture below. After introductions, they got to work on the trailer suspension repair work.
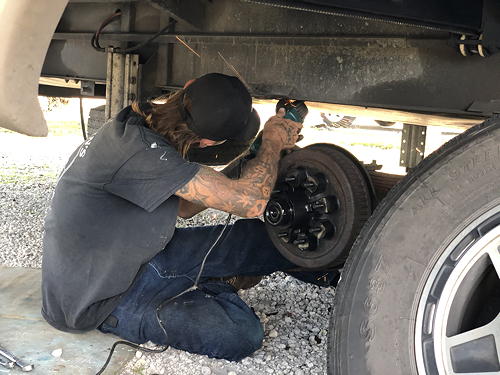
They started by removing the tire to give them better access to the broken mounting bracket. We offered to bring in the slide-out, but they actually had more room to work with the slide-out remaining out, so we left it where it was.
Removing the Old Bracket
Next, John had to remove the remains of the old leaf spring mounting bracket. Although the two sides had broken off, the base of the bracket was still welded to the trailer frame. He removed it first by using a cutting wheel to cut through the welds on either side of the bracket.
Once that was done, he pried off the bracket using a hammer and a chisel-like implement. Initially, it was tough going, but after going back and forth between cutting and prying, the bracket finally came off.
After prying off the bracket, John attached the new bracket and new bolt to the end of the leaf spring. John didn’t want to re-use the old bolt because it might have been damaged when the bracket broke. Then, he did a quick test to see how the bracket would fit.
Preparing the Frame
The first part of the trailer suspension repair was complete. Next, John used a grinder to remove the remains of the weld that had held the bracket on so that the new bracket would sit flush against the trailer frame.
With the surface of the trailer frame now smooth, it was time to test the fit again.
In the picture above, you can also just see that John has cut back the underbelly cover from the bracket so that it won’t be damaged or catch fire during the welding.
Below, you can see how the test fitting was done. The axle was supported on a block of wood and a jack was used to raise the axle so that the mounting bracket made solid contact with the trailer frame. It’s now ready to be welded to the frame.
The Welding
With the preparation complete, the actual trailer suspension repair could begin. The picture below shows John doing the welding.
With a picture worth a thousand words, what’s a video worth? Below are two very short videos of the welding. The welding machine was a self-contained unit with an internal combustion engine that drives a generator to provide power the welder. Most of the noise in the video is from the welding machine but you can also hear the welding itself.
With the welding completed and everything having cooled down, John painted the new bracket to protect it from corrosion. Any color you want as long as it’s black.

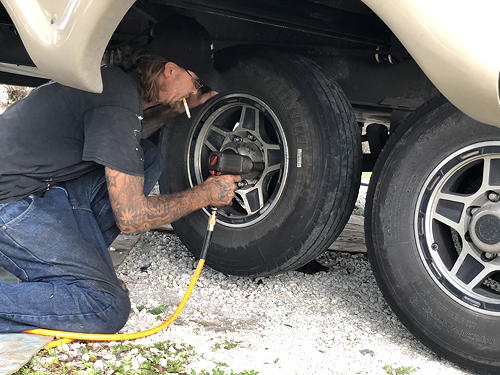
Finally, with the trailer suspension repair pretty much done at this point, John put the tire back on.
That completed the trailer suspension repair and it was done in less than two hours! The bill came to $160 but Joanne and I had already agreed on a higher amount to pay him, thus providing a very generous tip to reflect our gratitude. There’s what it cost for the work itself, and then there’s what the repair was worth to us.
Finally, before leaving, John quickly checked the other seven leaf spring mounting brackets. If any were cracked, he was going to put a bead of metal on them to strengthen them. Fortunately, they were all fine.
Then, they packed up and left with, once again, our profuse thanks.
Analyzing the Failure
It’s worth looking at the failed bracket and its broken-off sides to see how the failure must have occurred. In both pictures below, I’m holding the bracket side to the base of the bracket along the lines of the fracture surface. In other words, when the bracket failed, this was its orientation at that time.
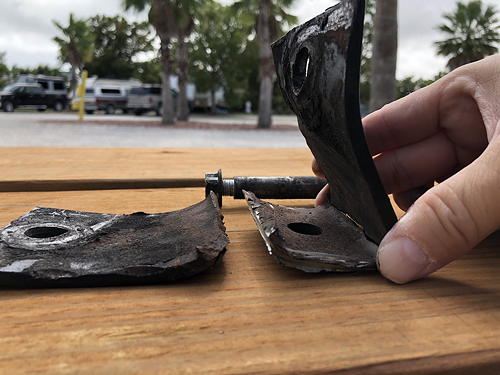
You can see above that the bracket initially bent sideways with the leaf spring attachment point maintaining it’s position perpendicular to the bracket surface welded to the frame. To me, this means that the side load broke the bracket. And, this must have been the first side to fail.
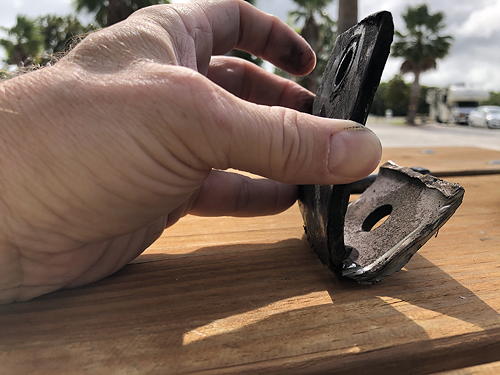
The side of the bracket just above must have been the second side to fail. Unlike the first bracket side, this one did not remain with its side perpendicular to the base of the bracket. If the other side of the bracket had already failed, then the leaf spring would have been free to twist. This would have allowed the orientation seen above where the leaf spring bolt was at a sharp angle to the base of the bracket instead of its normal position parallel to the base of the bracket.
Aftermath
I still need to do a bit of work to repair the underbelly where John had to cut it away so that he could do the welding without melting it or setting it afire. I want to keep mice out, so I don’t want to leave it the way that it is at the moment.
We were happy that the Bill and John were able to perform trailer suspension repair quickly and at a reasonable cost. We didn’t need to change any plans due to the failure. And, no further damage occurred before the repair. So, all things considered, this went really well.
Update
Three days later, on Thursday, November 14th, we left the campground for the trip home. One of the first things I noticed was that the trailer was now tracking properly behind the truck–it was no longer sticking out a few inches at the rear towards the center of the road. The trailer had been tracking poorly for a long time–that leaf spring mounting bracket, too, must have been broken a long time. I don’t want to think about how many miles we put on the trailer with it like that. We were very lucky that nothing else broke–the failure of the one mounting bracket meant that the remaining seven brackets had to do the work of eight. If any of those had let go, it would have been an ugly situation.
I just read your story about the Broken Leaf Spring Mounting Bracket . I just discovered mine is broken . I see that you’re in Florida I’m in PA I wish I had the guy that you have that fixed it.
Hi Kevin! Sorry to hear about your broken spring. You should be able to find someone nearby–I understand that mobile RV repair services are quite common.
In the summer of 2020 when we finally were able to resume RVing, we pulled our trailer out of storage only to discover that the spring on the other side had broken and damaged the propane line. I think that happened because the first spring had been broken for so long. During that period, the stress on the other spring, which was no longer completely parallel to our direction of movement, must have really weakened it. Eventually, it broke despite the repair of the first spring. So, keep an eye on your springs even after the repair!
We’re actually from Ontario, Canada. With the border closed due to COVID-19, we haven’t been able to return to Florida for a while. Hopefully we’ll be able to return this fall.
Best of luck!